
You can have your store up-and-running in under 1 hour, here’s how.
- A go-to for those interested in Shopify Plus, this short handbook covers important basic topics. We will dive into
- What does Shopify Offer?
- Data Organization Overview
- Personalized Products
- Navigation Menu
- Theme
- Development Workflow
- Third Party Applications
1. What does Shopify Plus Offer?
Shopify is a cloud-based e-commerce SAAS provider. It offers an out of the box solution that covers a basic store setup along with the necessary autoscaling server infrastructure. The basic store comes with functional checkout logic and payment provider integration. However, Shopify is closed source and only offers the possibility of front-end code modifications with very limited back-end access.
Front-end code is built using Liquid: Shopify’s templating language.
Advantages of Shopify Plus:
- Fast and simple setup
- Auto-scaling infrastructure out of the box
- Robust API allows for easier integrations
- Front-end styling and templating is straightforward
Disadvantages of Shopify Plus:
- No data ownership
- Back-end and infrastructure customization is not possible
- Not possible to change checkout flow
- Payment providers are limited to what Shopify offers
What do you need to do to make a simple store online
Setting up a store is possible in less than one hour. It consists of the following steps
- Install a theme
- Link the domain (optional)
- Select payment provider(s) https://www.shopify.com/payment-gateways#Gateways
- Select shipping provider or leave it as manual fulfillment https://help.shopify.com/en/manual/shipping/rates-and-methods
2. Shopify Data Organization Overview
Shopify organizes data as follows:
- Pages
These are the CMS pages that are managed by a CMS. - Collections
These are the product categories. A product can belong to several collections. - Products
Self-explanatory, these are the store products. - Tags
These are similar to attributes. Each Shopify product can have a list of tags attached to it. A tag can be used to add an extra piece of information to a product or to filter out products in product lists. - Variants
These are similar to configurable products. A product can have 3 options (framed or unframed, size, frame color) and each of those options can have several values. Each of the option x value combinations results in a product variant. A product can have a maximum of 100 variants.
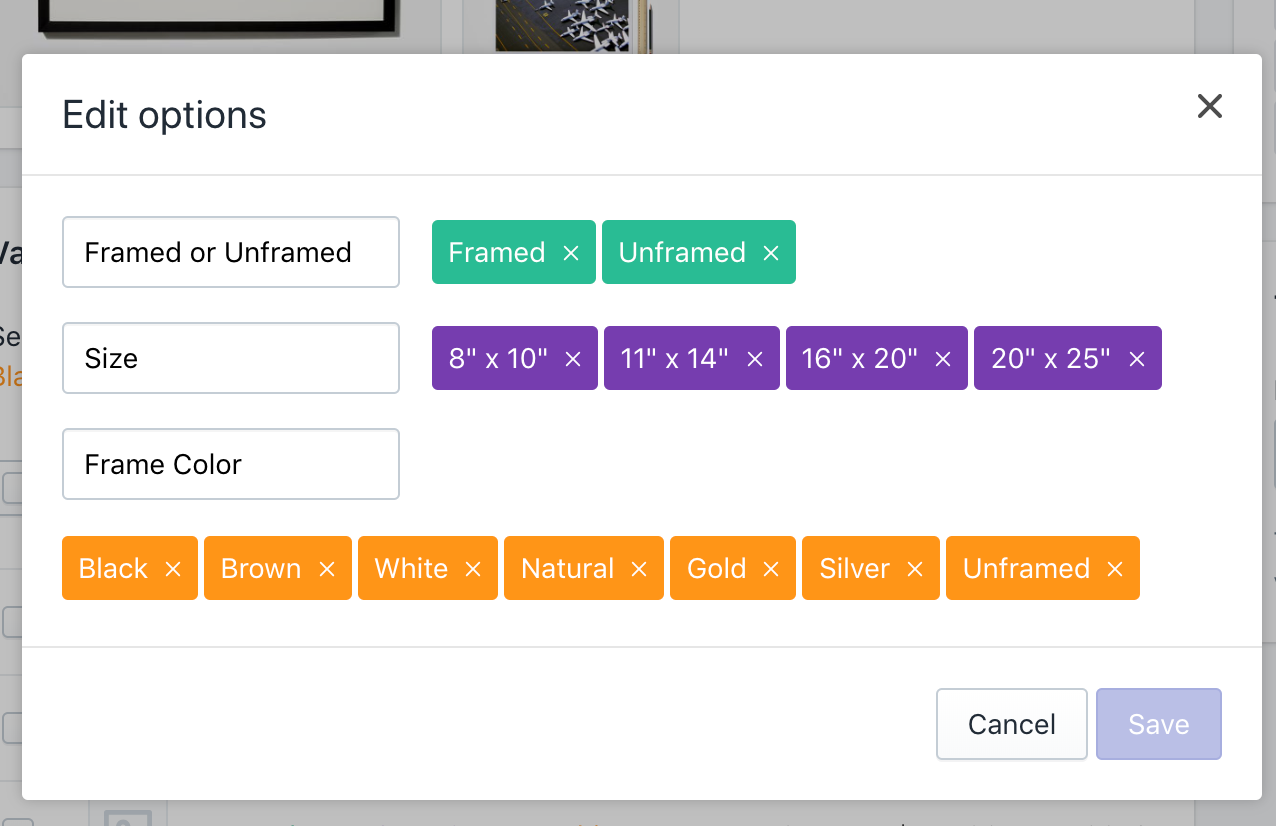 Example of a product option definition from the Shopify admin interface
3. Shopify Personalized Products
Let’s say you want to create a printed mug product that allows customers to have their name printed on it. This cannot be achieved using product variants. Instead, we can attach line item properties to the product when it’s added to the cart.
This simple customization can be made by adding an extra input to the form that will add the item to the cart, for example:
.
This is normally done in the PDP or any other page that offers visitors the ability to add such products to cart. Here is an example of such input.
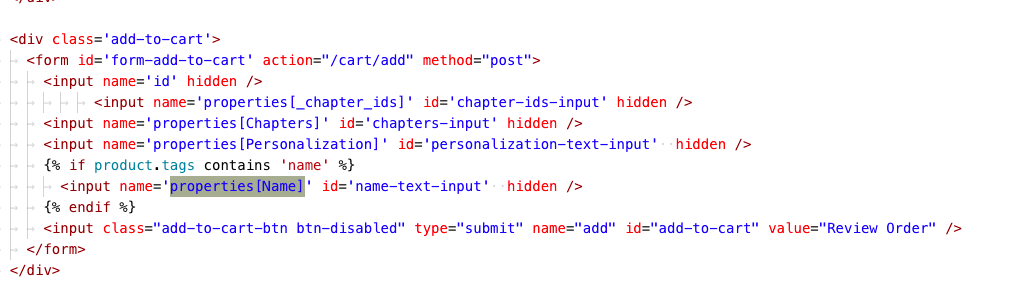 Shopify will automatically add the personalization properties as line items in the order
4. Shopify Navigation Menu
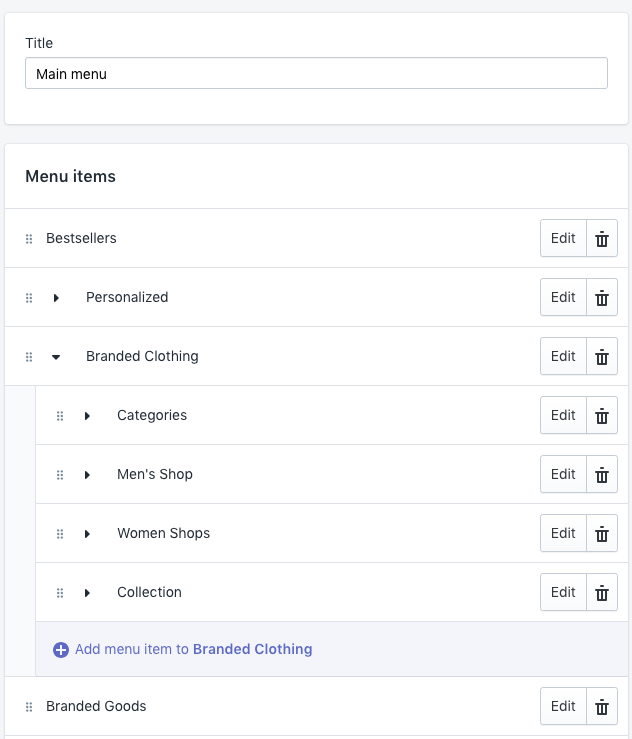
Defining the navigation menu store is done through the theme editor. This is a straightforward process, but we should be careful that the theme is designed to accept the levels of navigation defined in the menu manager.
Multiple menus can be created, for example, for desktop and mobile. Submenu trees are created within the menu itself.
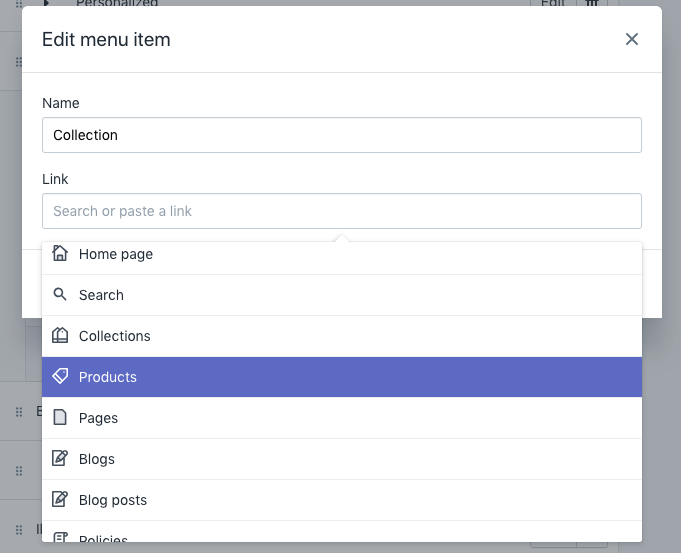
 Example of the menu manager
A menu item can be linked to the homepage, search page, a collection, a product, a page, a blog, a specific blog post, or the policies page.
5. Shopify Theme
The store theme is a set of assets and liquid files stored within Shopify. The theme needs to follow a strict folder structure: https://help.shopify.com/en/themes/development/templates
Assets
Images or CSS files that will be hosted on Shopify CDN.
Config
These files hold the theme editor configuration. There’s a configuration for the theme management schema and another file that holds the values.
Layout
Used for defining the layout of the store and the checkout.
Locales
Files structure used for translation and localization.
Sections
Used to store reusable FE modules that can be placed in different pages using the theme editor.
Snippets
Portions of Liquid code that can be included in other pages such as showing product badges if a product has a certain tag or defining how discounted prices are rendered.
Templates
Single page templates (product page, collection page, etc.)
Any front-end framework can be used to develop a theme. As long as the final theme bundle respects the file structure described above.
Setting Different Templates for Specific Collections or Products
Let’s take the example of a PDP with a different template. For example, products belonging to a specific collection or having a specific tag.
Content for the product details page is defined in the templates/product.liquid file. To create a different template for a different product we can create a file with name product.*.liquid.
The template will be selectable from the when editing a product. This section is located at the bottom right of the screen under the tags sections. Unfortunately, this has to be on a product-by-product basis.
If a product importer is used, this process can be automated.

Adding Customization Options for Theme Management on Shopify
Shopify allows us to customize the admin panel for the theme and add options for managing content blocks without the need for code deployments. The theme customization options are defined in the file config/settings_schema.json
Here is an example of giving a shop administrator the ability to enable and disable a CTA bar and manage its content and styling.

Topbar settings definition:
The JSON defined in the config/settings_schema.json results in adding the following section in the theme admin panel:
[{
   “name”: “Topbar”,
   “settings”: [
     {
       “type”: “checkbox”,
       “id”: “topbar_enable”,
       “label”: “Enable Topbar”
     },
     {
       “type”: “text”,
       “id”: “topbar_content”,
       “label”: “Content”
     },
     {
       “type”: “color”,
       “id”: “topbar_background_color”,
       “label”: “Background Color”,
       “default”: “#000000”
     },
     {
       “type”: “color”,
       “id”: “topbar_text_color”,
       “label”: “Text Color”,
       “default”: “#ffffff”
     }
  ]
}]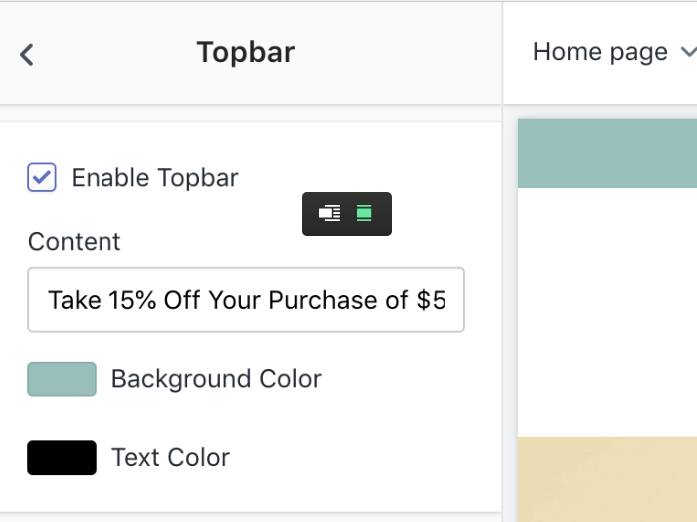
Changes the values for the Topbar configuration are saved in the config/settings_data.json file. Here is an example:
{
   “current”: {
      “topbar_enable”: true,
      “topbar_content”: “Take 15% Off Your Purchase of $50 or More with Code NYT15<span class=”topbar-details”>details</span>”,
      “topbar_background_color”: “#8fc0bc”,
      “topbar_text_color”: “#000000”
      }
}
Shopify simply writes the id-value association to the “current” object. This object is later used when creating page templates.
Referencing the settings value from the theme
To reference the settings from the liquid value you can use settings.settings_key
{% if settings.topbar_enable %}
<div id=”top-bar-cta” class=”topbar”>
  <div class=”topbar-wrapper contained”>
    <div id=”topbar-btn-closer” class=”topbar-btn-close”>{%include ‘svg-close’%}</div>
    <div class=”topbar-content”>
      {{ settings.topbar_content }}
    </div>
  </div>
</div>
{% endif %}
In this case, we see that if the topbar_enable is true, the template will render the relevant HTML with the content from settings.
For color and background, a .scss.liquid file can be used to reference the settings directly from CSS. These styles can have dynamic values that are set by the theme settings.
.topbar {
 background-color: {{ settings.topbar_background_color }};
   .topbar-wrapper {
     .topbar-content,
     .topbar-btn-close,
     a {
       color: {{ settings.topbar_text_color }};
     }

     .topbar-details {
       border-color: {{ settings.topbar_text_color }};
     }
     #icon-close {
       fill: {{ settings.topbar_text_color }};
     }
  }
}
This style sheet can then be included in a template by using the following code in the template file:
{{ ‘settings.index.top-promo-banner.scss.css’ | asset_url | stylesheet_tag }}The same approach can be used to define different customizable sections of the theme. A banner or a media slider could be implemented in the same way.
6. Development Workflow
Shopify does not specify any development stacks or workflows when it comes to developing a theme and Shopify doesn’t support creating local setups and installations. Additionally, themes do not support versioning.
Local environment and staging
Since the only method of seeing actual results is by deploying code changes to Shopify, each developer is required to create their own store and replicate the configurations, products, metafields, etc.
Working with VCS
As soon as all developers in the team have created their stores. We can use a Git repository.
We use the following branch strategy for a store that is already live :
- Developers work on their feature branches
- If a client has a staging store, we use a staging or development branch as a merging point to deploy new features to the staging store
- Changes are merged into the master branch once the client has approved the changes.
- For every deployment to production, we add a tag to the master branch.
Additionally, we use Slate, a private Shopify application, which is a tool that allows us to create and deploy themes easily.
7. Third-Party Applications
For custom functionality or enhanced shop management, Shopify offers two sets of APIs that can be used to develop third-party applications. The choice of programming language, framework, and tools is not limited. The APIs are RestFul and can be accessed via an HTTP or GraphQL client.
Storefront API – https://help.shopify.com/en/api/custom-storefronts/storefront-api. Allows building a fully customizable shopping experience. It would be a good fit for PWA development or native mobile applications.
Note: Not all Shopify features and data are available through this API.
Admin API – https://help.shopify.com/en/api/reference. Allows building custom administration features and reporting tools. It will provide access to read and write orders, customer data, product data, etc.
Since 2003, Scandiweb has been providing eCommerce solutions for brands such as Walmart, Jaguar, the New York Times, and more. If you have any questions, do not hesitate to contact us at [email protected]!

Share on: