
One of the most valuable pages on every eCommerce website is the checkout — the last step in a user’s journey, which, in the best case scenario, should result in a purchase or revenue increase from a business perspective.
Although, in most cases, the thought of “the last step” would give a feeling of relief, in eCommerce this might seem like the most challenging step for the user in their whole journey, when all previous wishes and doubts, needs and frustrations are in a fight with each other. Therefore, one of the biggest questions for conversion rate optimization specialists is how to build a checkout form which would motivate users to complete the purchase.
In the next paragraphs, you’ll find a few ideas, based on the experiences of industry professionals, which can make users feel more comfortable and more confident with the purchase they’re about to make.
Checkout Form Guideline 1: First impression is king
According to research made by Google, it takes 50ms (0.05 sec) to make a first impression. And there is only one crucial chance to make this first impression encouraging, so the user would start filling in the form. In case of the checkout, the first impression will depend on such factors as structure, colours, spacings, amount of text, used fonts and many others, but what is common for all of them — it is all about the design.
To understand if this really works as described, an A/B test with two checkout form variations was performed. In variation A the checkout form had 7 obligatory fields while variation B had 10 fields, more white spaces, and less unnecessary text. The results showed that variation B converted much better.
That allows us to conclude that the first impression is not about the content, it is about perception — if the checkout form looks easy at first glance, the chances that a user will start to fill it in are bigger.

Variation A with 7 obligatory fields and Variation B with 10 obligatory fields, less optional fields, more white spaces and less unnecessary text
However, we suggest to reach for perfection and make the form attractive not only from a perspective of design but also from the points of usability and logic. If a user starts to think of what he should write in or even what he should do, he might end up with the question if he really needs the product.
Checkout Form Guideline 2: Less effort equals higher chances to achieve conversion
Filling in forms is one of users least favourite parts of online shopping. In a research conducted by Baymard Institute, it was found that the third most frequent reason why users abandon the checkout is that the form was too long or too complicated. What’s more, in the same research it was discovered that the average checkout form consists of 14.88 fields, 20–60% of which could be removed. Thus, the main question is what to reduce and how to do it in the most efficient way.
Firstly, use auto-complete functionality when it is possible. It will speed up the process and reduce possible misspellings. The most common example of when to use it is in address fields. Many well-known e-commerce stores use this smart feature to detect City and State. E.g. if you ask the user to enter their ZIP code, the system can easily detect to which City and State it belongs. To do this properly don’t forget to place the ZIP code field above City and State and offer a fallback option — there might be some system bugs. The same can be done with credit card type detection and full address auto-completion.
Secondly, pay attention to optional fields. Even though they might seem invisible, when a customer will evaluate the form for the first time, they will notice them eventually and might spend a lot of time analyzing them. Also, the user might not understand what to write in some optional fields. E.g. Many users still do not understand what’s the purpose of Address field 2 — Should they divide their address somehow? Write more details? Or give comments about the address? In this case, the best solution would be to collapse it behind a text link. The same can be done with Company name.
Thirdly, decrease possibilities to make mistakes. Implement not only a validation functionality but also include details such as specific keyboards on mobile, drop-downs with choices, specialized number fields where the user can see how many numbers he needs to enter and where numbers are separated by spaces. Small details like this will reduce the number of actions a user has to make and will show the user what to do or at least what to choose from.
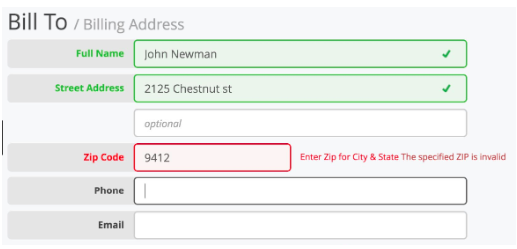
Example of form with validation and auto-complete functionalities that could help to complete checkout faster
Checkout Form Guideline 3: True friendship comes naturally. Don’t force users to create accounts.
In the same research by the Baymard Institute, 35% of the respondents mentioned being asked to create an account to make a purchase as one of the main reasons for leaving the checkout unfinished. As once heard in a conference – making an account is not only about sharing private details, but is also like building relationships with all the commitments and responsibilities.
To understand how your customer might perceive this step think about your answers to the following questions. Do you remember every e-commerce store you have an account with? Are you interested to build relationships with all of them, develop long-term communication and become loyal to them? Most likely no, so next time when planning a checkout decide whether you are ready to lose revenue only because of an obligatory account or forced commitments.
What’s more, a few weeks ago Apple published an advertisement about this topic. Although it emphasizes the face recognition functionality, it also clearly describes how easily consumers can get into a panic when trying to remember one of many passwords. Don’t force users to participate in a “memory challenge” and consider implementing a guest checkout.
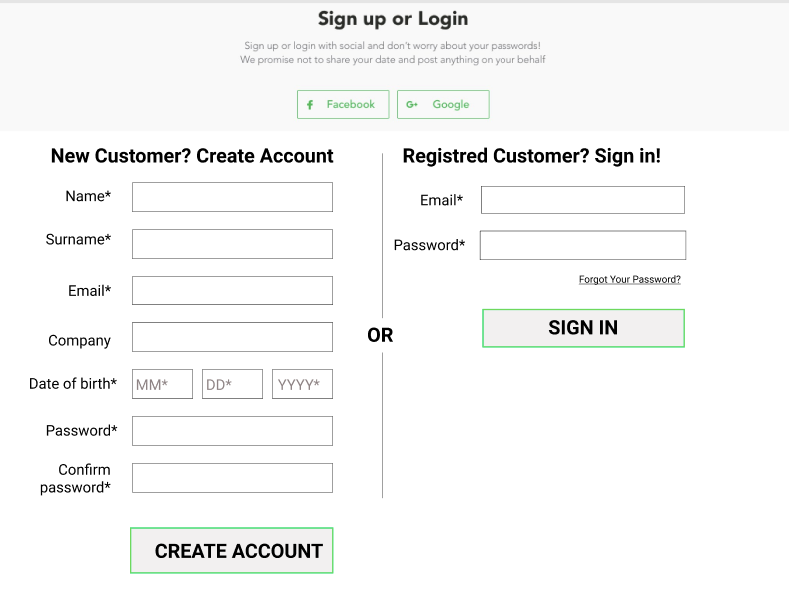
Example of form with obligatory checkout — 9 more fields to fill before making a purchase
If you have decided that it is still worth to include obligatory registration, explain to users why it is necessary and list all the advantages compared with non-registered customers. Even though the store should bring revenue to the business owner, the most important person in the room should be the customer — if they don’t understand the added value and why your product is exclusively amazing, they might leave the website to look for a better offer.
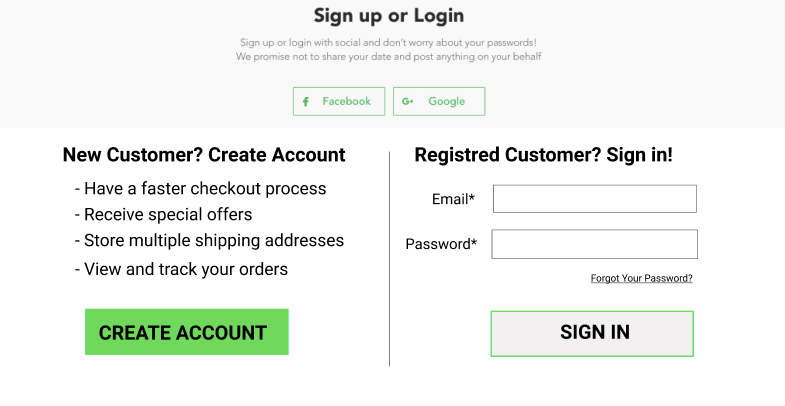
Example of form that lists advantages user will have after creating an account
Checkout Form Guideline 4: Safety first and safety always
According to Shopify the first official eCommerce purchase was made in 1994. Despite it happening over 24 years ago, customers are still afraid about data safety when sharing payment details — in research conducted by Klarna together with University of Reading it was discovered that 23% users have left the checkout because they didn’t trust the website. There might be at least two ways on how to persuade a user to continue to the payment step.

Firstly, show trust badges and available payment methods. Companies who provide safety services have put a lot of effort to build a good reputation in the industry and, therefore, users know and trust them. Show your cooperation with trustable partners and users will trust you as well. At the same time, not all users have technical knowledge of SSL certificates, hence you can simply add a self-made trust badge and it will already be a step forward.
Secondly, show contact details of customer service. Even though the quality of product images and product descriptions has increased, everyone will know a case when the received product was completely different from the ordered one. By sharing contact information customers will be more convinced that they’ll receive help in case of a misunderstanding. What’s more, if a user will have questions about payment or delivery, he will be able to clarify them while completing the form.

The most trusted and familiar trust badges according to research performed by Conversion XL
Conclusion on Perfect Checkout Forms
These are not the only principles you should follow when planning the perfect checkout form. However, this is a good foundation to use, when exploring new opportunities of making the last step of a user’s journey more pleasant.
Want the perfect checkout form for your eCommerce Store or if you would like to share your thoughts on this topic, write to [email protected] or check out our CRO Services Page.
Share on: